The LDaCA REMS system administrator assigns the Resource Owner role to data stewards or their designated persons.
A Resource Owner can set up license approval workflows and manage resource entitlement processes.
Listing a new catalogue item
To set up a new resource entitlement in the tool, the Owner must list a catalogue item. This is done by creating the following in the given order:
1. Organization
2. License
3. Form
4. Resource
5. Workflow
6. Catalogue Items
1. Organization
In brief: Check first if the required organization is already listed and use it, otherwise create a new organization.
An organization is the custodial organization of the resource (i.e. the license) being managed, e.g. Australian National University. An organization may be connected to multiple resources.
1.1 Create an Organization
- Log in to LDaCA REMS.
- Select the top menu, Administration, then the sub-menu item Organizations.

Image Source: LDaCA
- Check if the organization is already listed by browsing the list or by using the search box to find a known organization by name.
- If the organization is listed:
- Select View on the right-hand side and check that the details are correct.
- Go to the next step, Create a License (in Organizations).
- If the required organization is not listed, create a new organization.
- If the organization is listed:
- To create a new organization, select Create organization.
- Fill in the fields in the Create organization window:
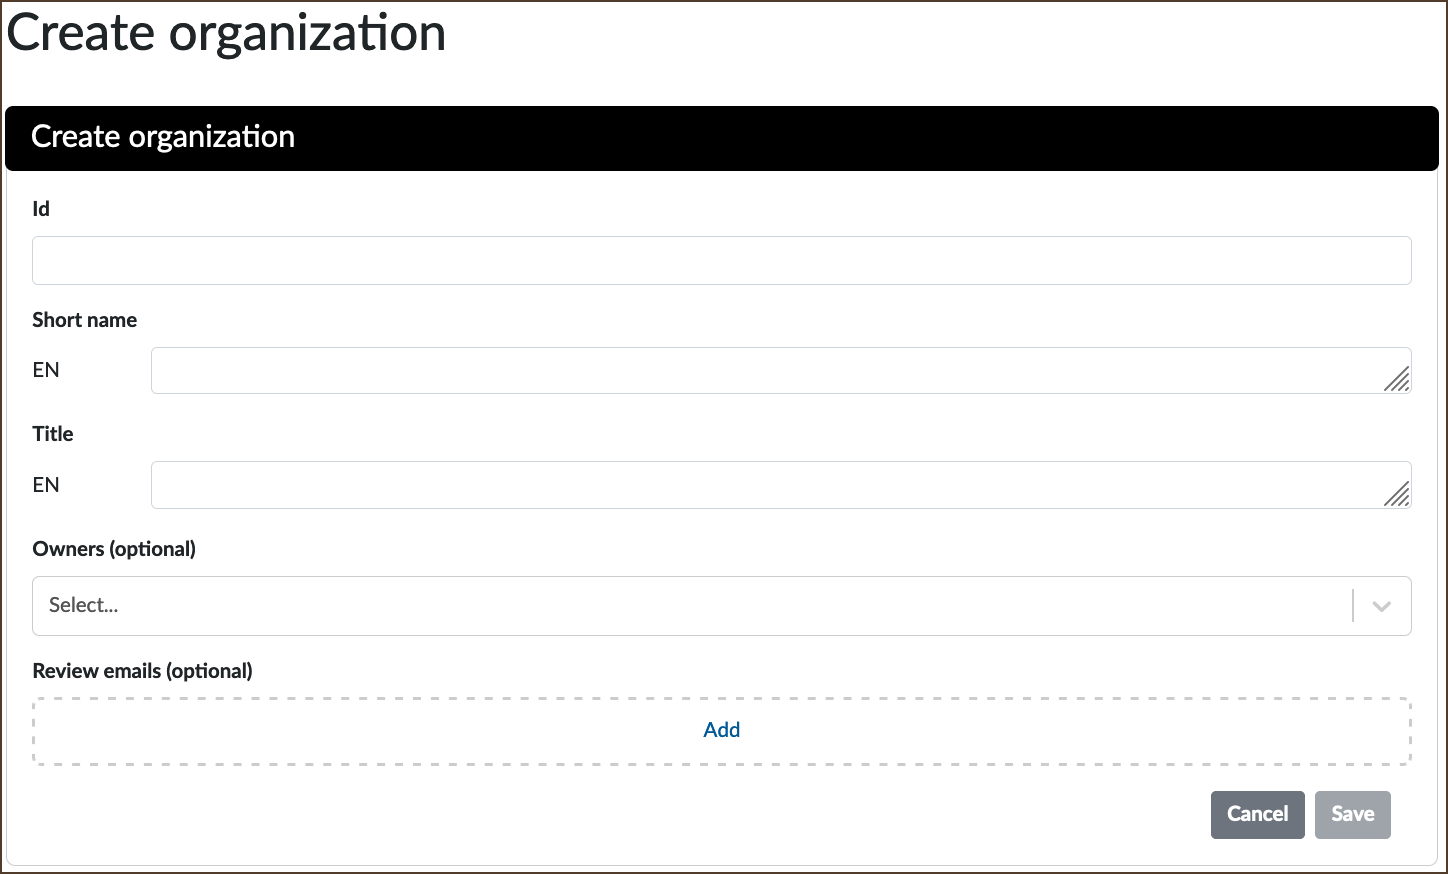
Image Source: LDaCA
- Id: Enter an identifier for the organization. Choose a short, one-word, easily recognisable ID. Letters (upper- or lowercase), numbers, hyphens and underscores are allowed. Avoid special characters.
- If the Id you entered is already in use, a warning text will display upon attempting to save the record:

Image Source: LDaCA
- A new organization record will save, even if the Short Name, Title and/or Owners are already in use, as long as the Id is not yet in use.
The Id field cannot be edited once the record is saved.
- Short Name: Create a short name for the organization - this will display in the Organizations list. Enter a one-word name; hyphens and underscores are allowed.
- Title: Enter the full name of the organization - this will display in the Organizations list. Spaces are allowed.
- Owners: (Optional) Choose from the drop-down list of Owners.
- Review emails: (Optional) Click Add to enter a name and an email address where license applications may be sent for review prior to approval.
- Click Save when done.
- The record will save even if the Owners and Review emails fields are left blank, but it is recommended that you enter information in one of these fields before saving the record.
- If the required name is not listed in Owners, use the Review emails option to add a new email address.
1.2 Edit an Organization
- Go to Administration > Organizations
- Locate the relevant organization from the list.
- Select View on the right-hand side to display the record.
- In the record, select Edit at the bottom right-hand side.
- Make the necessary changes in any editable field.
- Click Save when done.
1.3 Disable or Archive an Item
The Disable and Archive functions are available for items in Organizations, Licenses, Forms, Workflows, Resources and Catalogue.
- Disable an item to hide it from Applicants.
- Archive an item to hide it from Applicants and in the administration view as well.
Access the Disable and Archive buttons either:
- Directly from the items list; buttons are in the rightmost columns
- By selecting View from the items list to display the item record where the buttons are in the bottom right-hand corner.
The buttons may appear grey, but are clickable.

Image Source: LDaCA
- To hide an item from Applicants, select Disable.
- The Disable button toggles to Enable, allowing either action to be reversed.
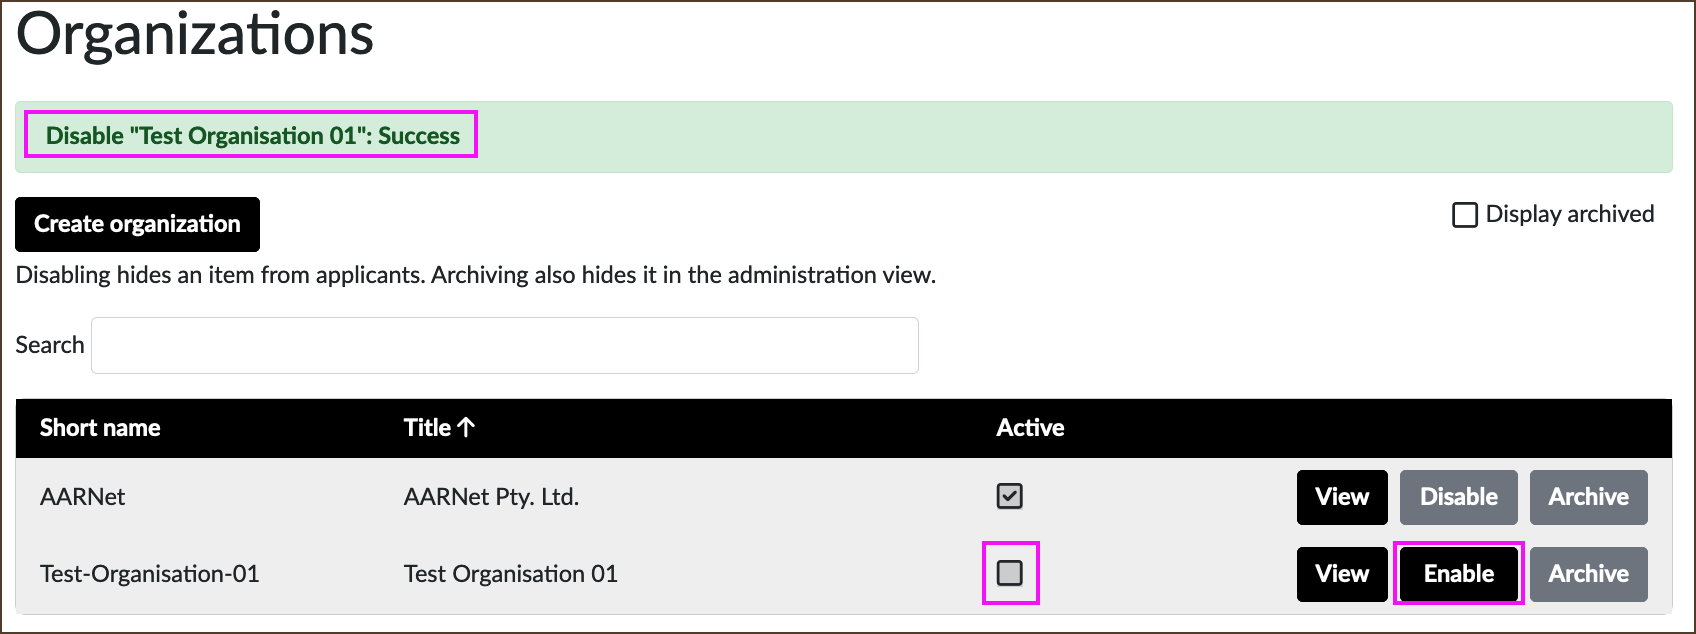
Image Source: LDaCA
- To hide an item in the administration view as well, select Archive.
- The Archive button toggles to Unarchive, allowing either action to be reversed.
- To display archived items, tick the Display archived box (above the list at right).
Ticking Display archived does not remove the item from the archived state.

Image Source: LDaCA
2. License
In brief: Confirm if the required license has already been listed by your organization and is suitable to reuse for your purposes, otherwise create a new license.
A license record cannot be edited after it is saved.
- Go to Administration > Licenses
- Check if the license is already listed by browsing the list or by using the search box to find a known license by name.
- If listed, select View and check if the details are correct for your purposes.
- If reusing this license, go to the next step, 3. Form.
- To create a new license:
- Click on Create license.
- Fill in the fields:
- Organization: Choose your organization from the drop-down list.
- License type: Always select External link. The License link field will display.
- License link: Enter the URL of the license document.
- Title: Enter the name of the license.
- Click Save when done.
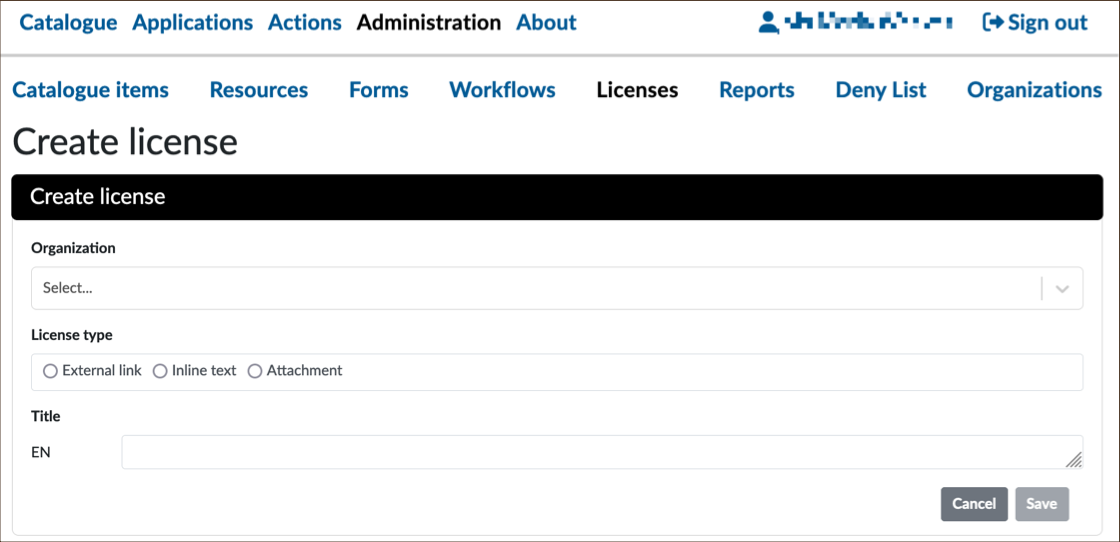
Image Source: LDaCA
2.2 Manage a License
Once a license record is saved, the values in the fields are no longer editable.
If there are errors in the saved license, you can disable and archive it (see 1.3 Disable or Archive an item) and create a new license.
3. Form
In brief: Decide if the default form (explained below) is suitable and adequate for your purposes. If so, you do not have to create a new form. REMS will automatically launch the default form for Applicants. Alternatively, you can create a new form by building on the default form using different form fields.
In LDaCA REMS, a form is the license application form or interface through which an Applicant may view the license, accept the terms and submit the application for approval.
Owners can create a customised form with additional fields that can, for example, ask the Applicant to provide more information (e.g. contact information, copy of a research proposal, answers to a questionnaire). Permissions are granted only when the Resource Owner (data steward or their designated Handler or Approver) approves the application.
3.1 Default License Application Form
A default license application form is generated in LDaCA REMS when no form is connected to a catalogue item:

Image Source: LDaCA
Below is the Applicant’s view of the default license application form:
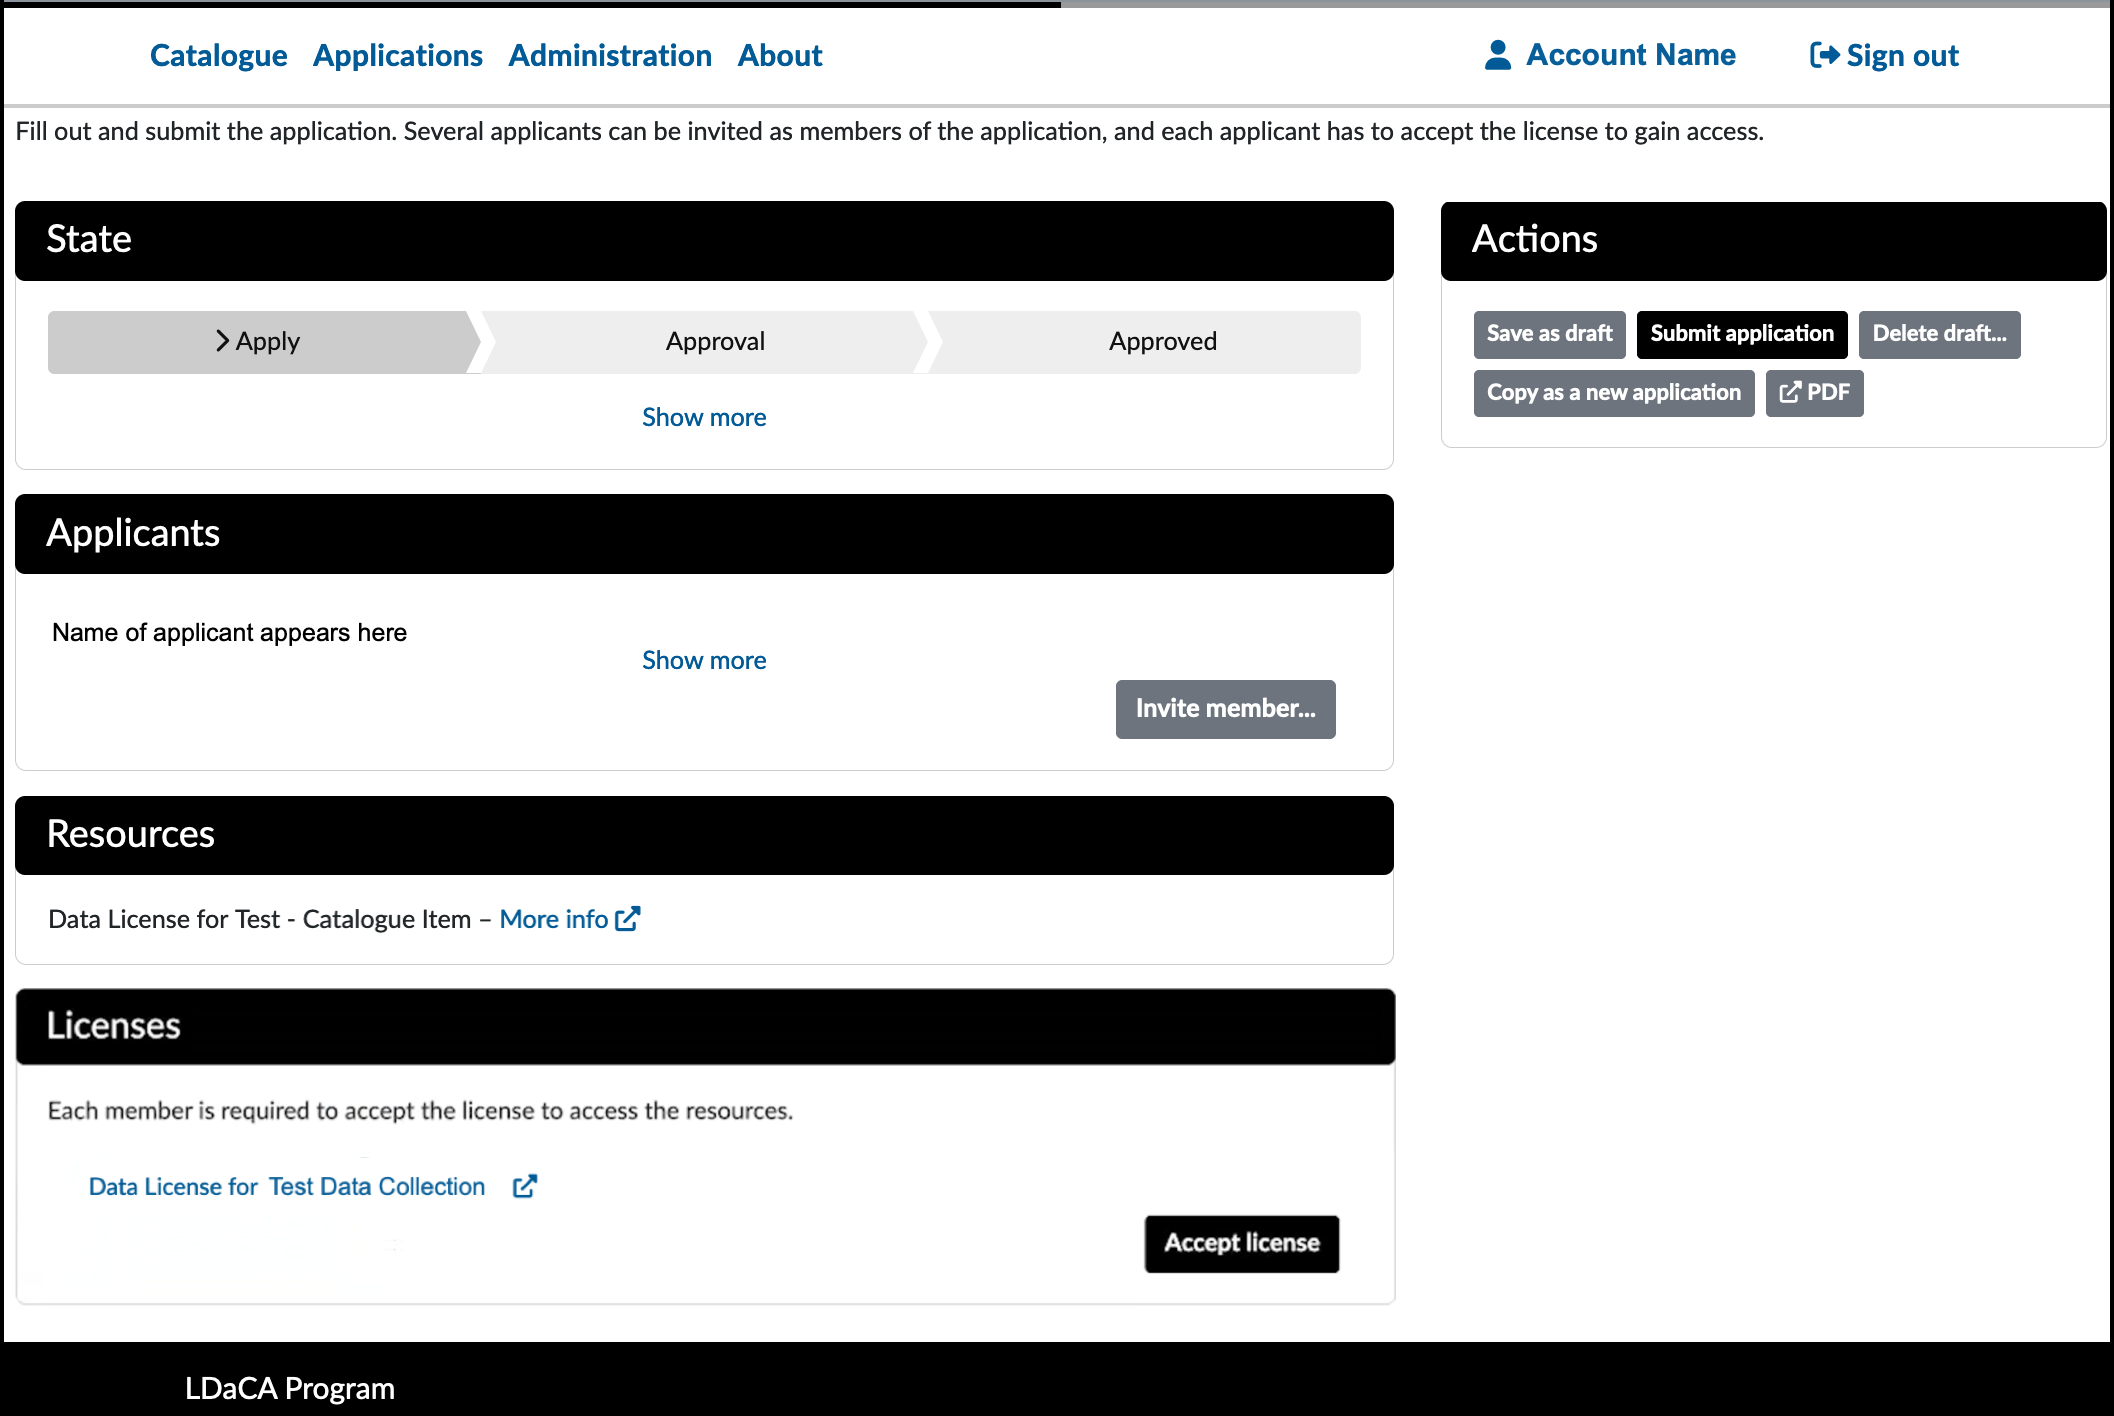
Image Source: LDaCA
This form is suitable for a basic workflow where an application is done in three steps:
- Log in to the LDaCA Portal and LDaCA REMS;
- Confirm acceptance of the license terms by clicking Accept license;
- Submit the license application by selecting Submit application.
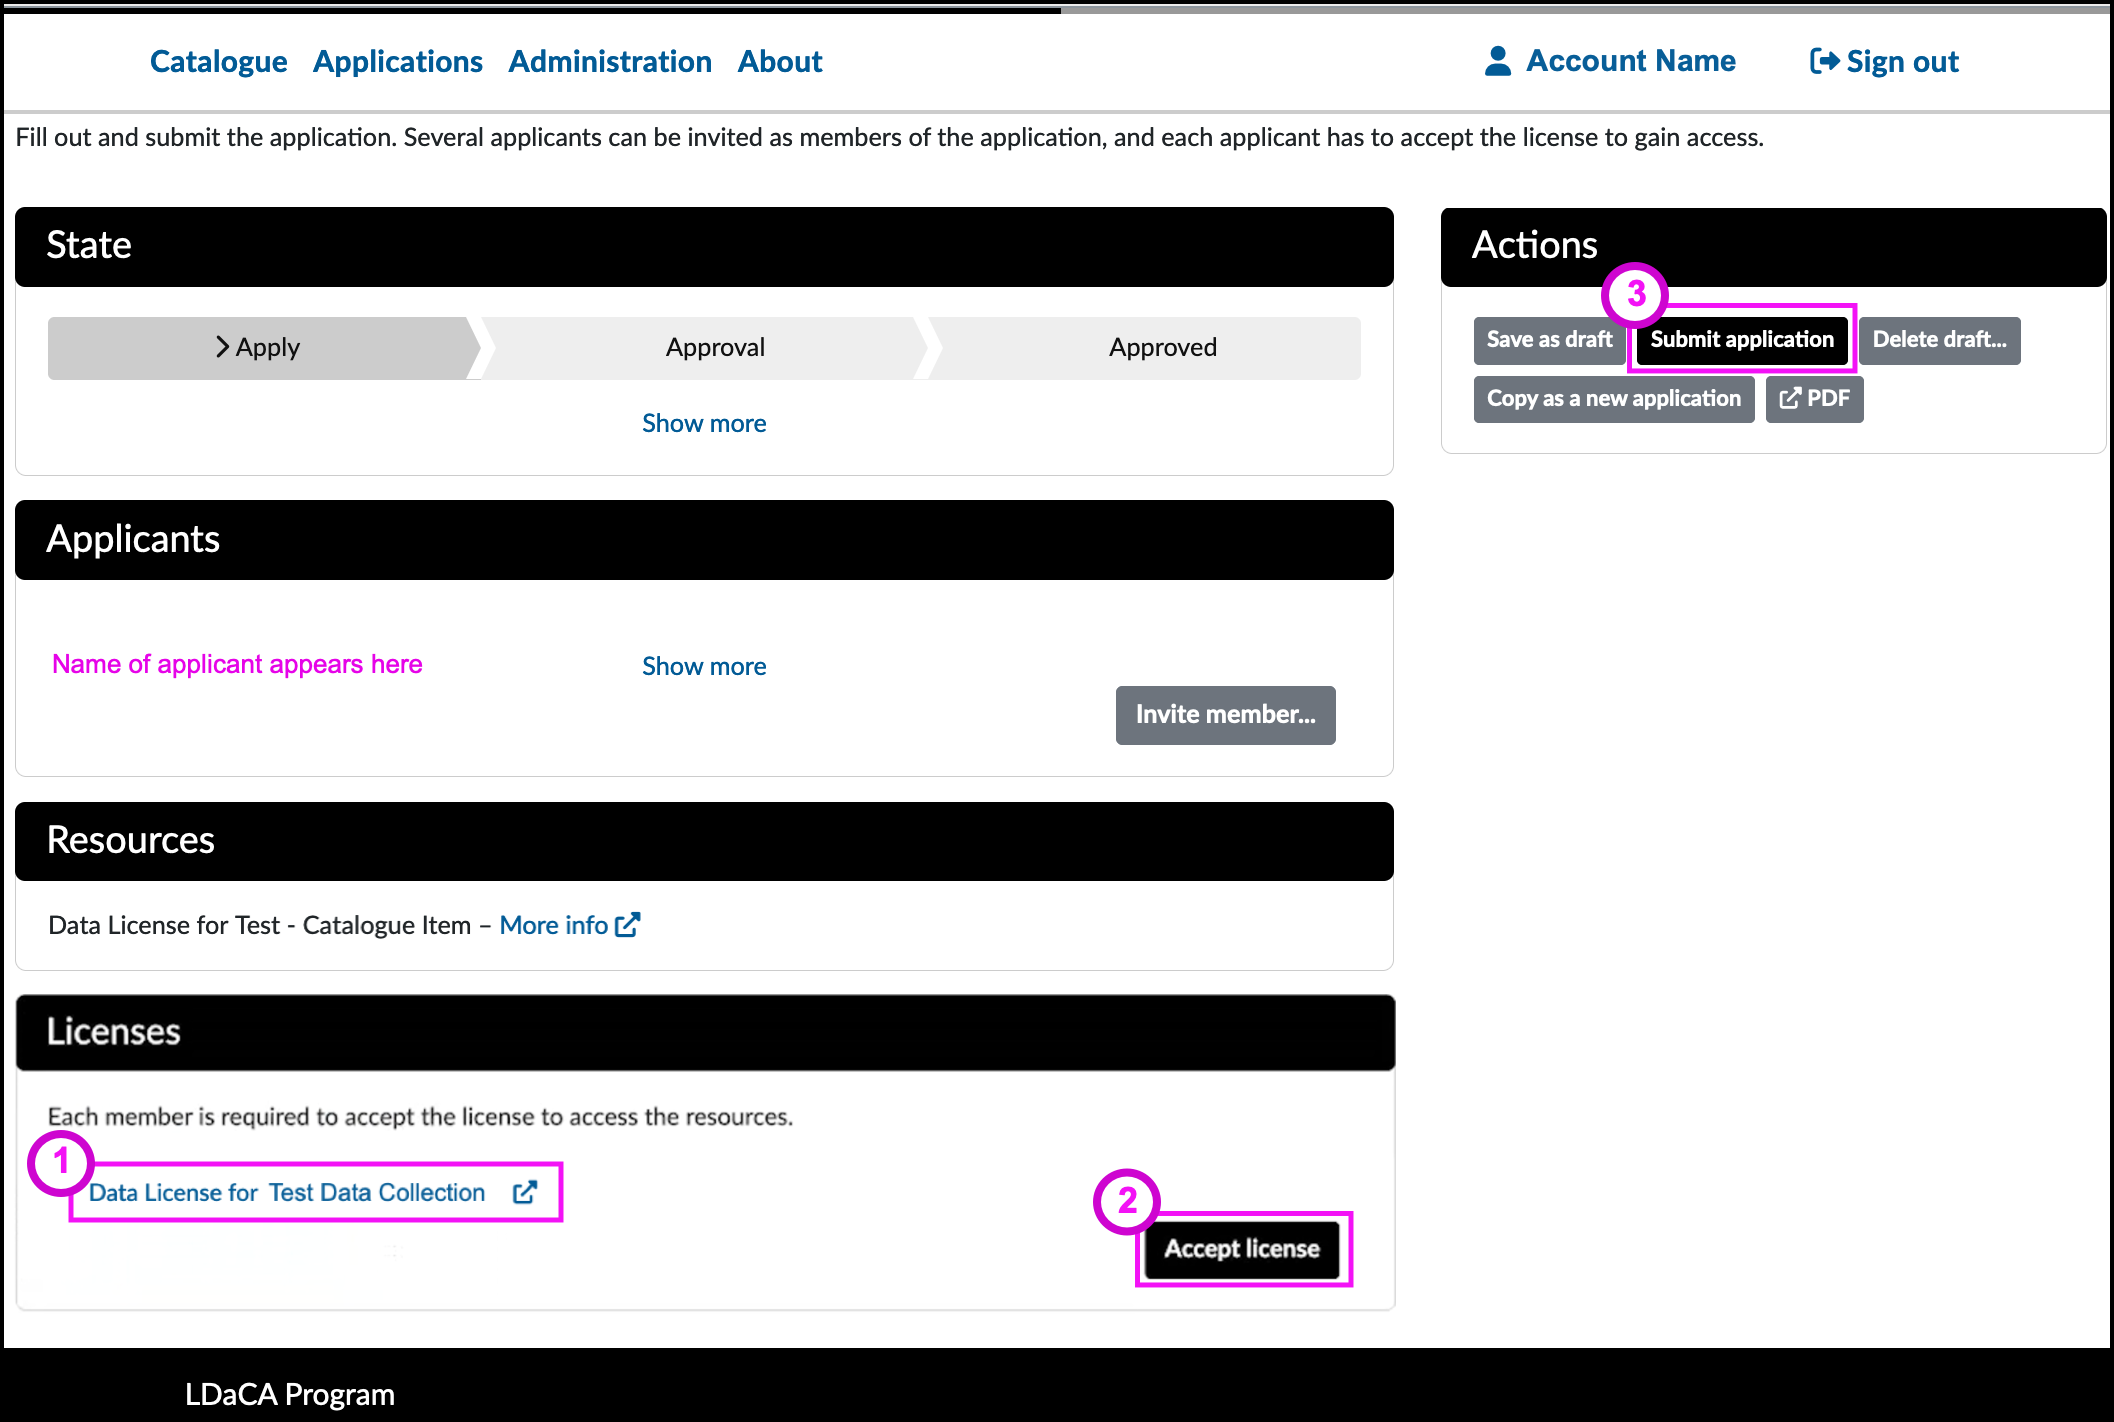
Image Source: LDaCA
The Resource Owner should inform LDaCA staff whether license applications will be manually approved by a Handler or by an Approver Bot (automated).
If using the default form, go to the next step, 4. Resource.
3.2 Create or Edit a Form
In brief: Create a form template using various types of fields.
The default form can be used as a base template to build on by adding various types of fields to create a custom form that requires more information from the Applicant, e.g. purpose(s) of data use, description of the research project, names of co-researchers.
Reuse an Existing Form
You can only edit the form as long as it has not been connected to a catalogue item. An alert text will display if you attempt to edit a form that has been connected to a catalogue item.
- Go to Administration > Forms
- To reuse a previously created form exactly as it is:
- Locate the form in the list
- Select the form’s View button and note the details.
- Go to the next step, 4. Resource.
- To reuse a listed form as a template for making a new form, select Copy as New.
- Add elements to create a new form.
- Click Save when done.
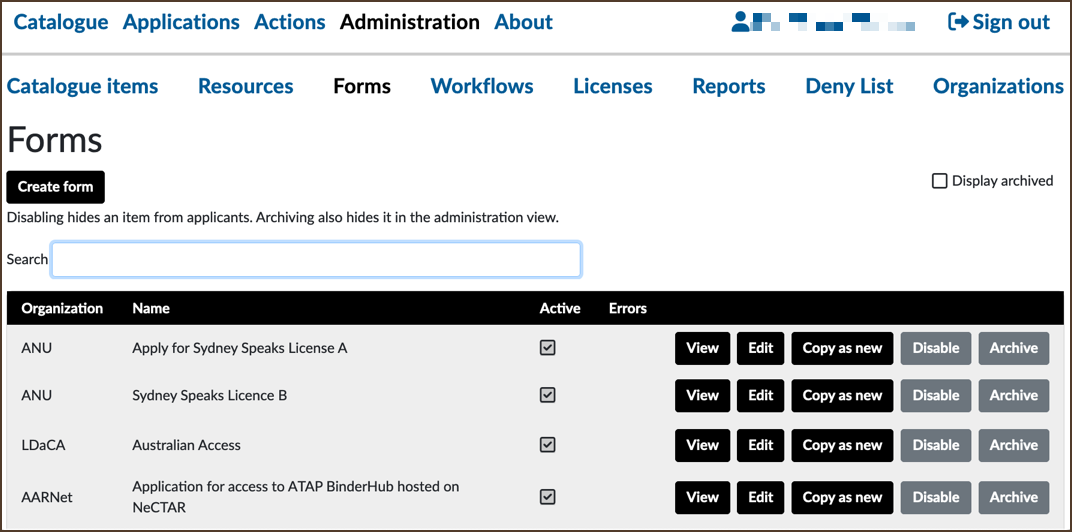
Image Source: LDaCA
Create a Completely New Form
- To create a completely new form based on the default form, click on Create form.
- Fill in the Organization, Name and Title.
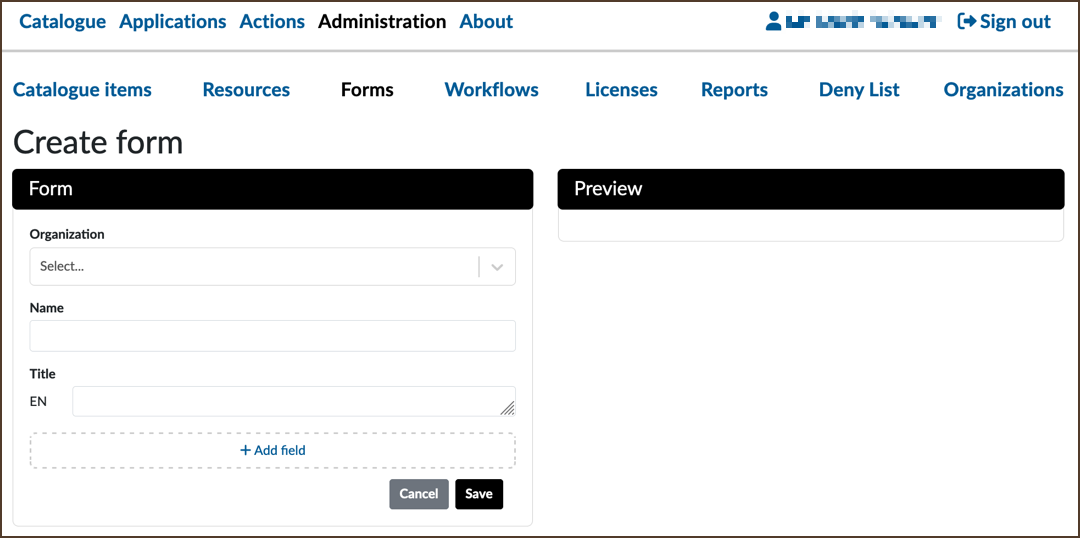
Image Source: LDaCA
You can save the form at this point and continue editing it another time. Remember that you can only edit this form as long as it has not been connected to a catalogue item.
- Click on + Add field to display the different types of fields available.
- The image below shows the 2-panel window that appears after clicking on + Add field: Field 1 on the left where you combine fields and select options, and the Preview on the right that shows what the selected field/option would be like.
- Select a Field type - in the image below, the Application title field is selected.
- Below Field type are the Optional fields: Field description, Placeholder text and Additional settings. By default, these are initially hidden (collapsed) but are shown expanded in the image. The Privacy and Visible drop-down options are also shown.
- Depending on the Field type selected, different elements appear below the optional text fields and the Preview panel.
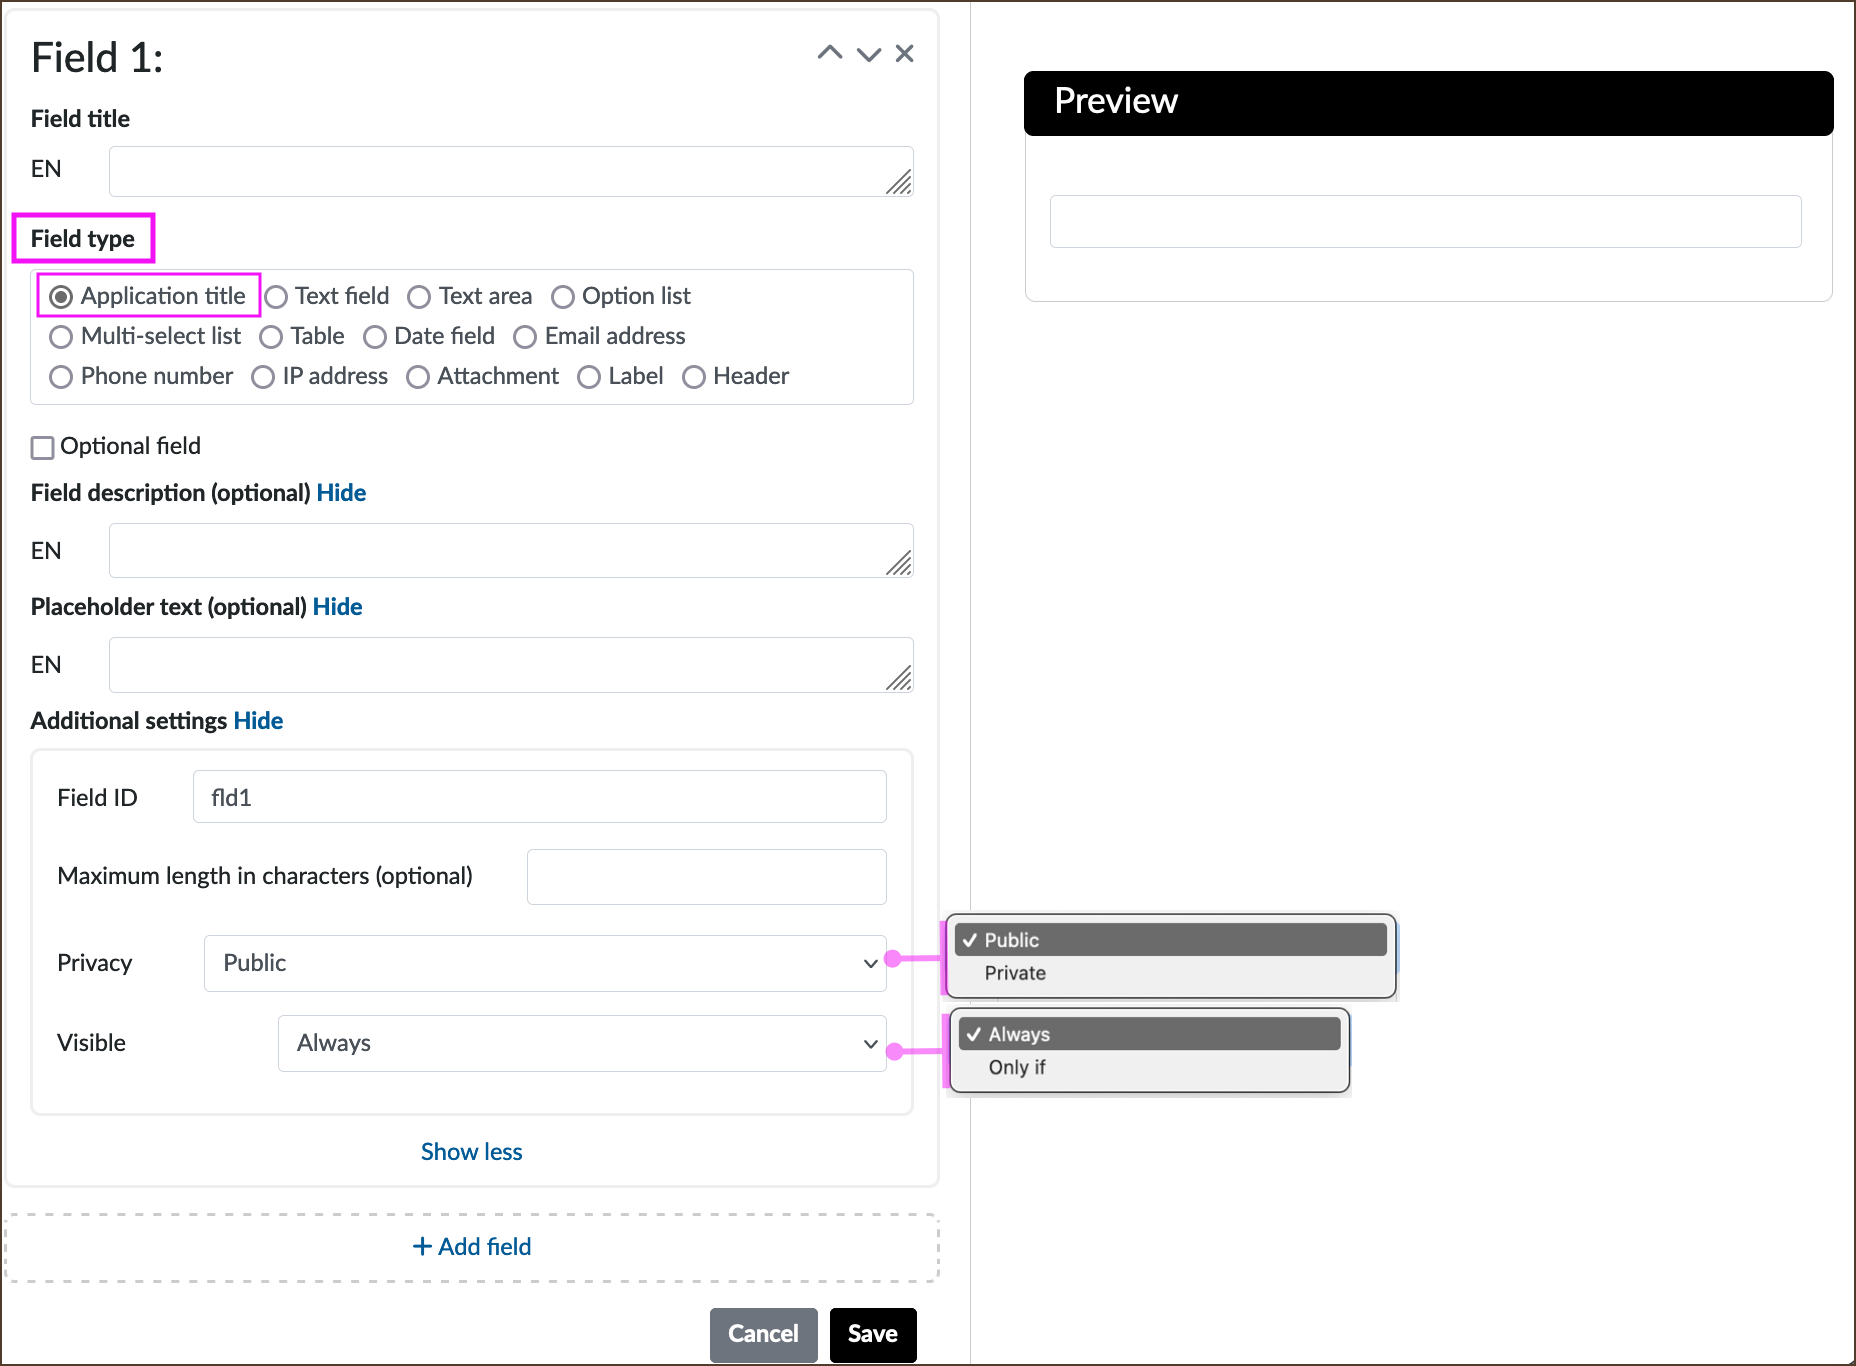
Image Source: LDaCA
The fields are briefly described below (CSC REMS Manual, 2021):
Field types
- Application title: Allows Applicants to provide a name for their application.
- Text field: Accepts a line of text and sets a maximum character length in the Additional settings options.
- Text area: Accepts a longer line of text; set maximum character length in the Additional settings options.
- Option list: Applicants can choose one from a given set of options; you set up the options one at a time using the + Add option feature.
- Multi-select list: Allows Applicants to choose one or more from the given options; you set up the options one at a time using the + Add option feature.
- Table: You set up a set of columns and at least a row; the Applicant can add rows as needed.
- Date field: Provides a formatted date entry field (DD/MM/YYYY) and a date picker calendar widget.
- Email address: Validates the email the Applicant has provided.
- Phone number: Takes a phone number in an international format (E.164), e.g. +14155552671.
- IP address: Validates the IP address the Applicant has provided in IPv4 or IPv6 forms. The IP address must not be within the known private range.
- Attachment: Allows one or multiple attachments of up to 10KB each only. The Preview shows the uploadable file formats:

Image Source: LDaCA
- Label: A descriptive text to give the Applicant additional information or instructions regarding some field.
- Header: Can be used to divide the application form into sections.
- Optional field: [tick box].
Optional fields and sub-options
- Field description: (Optional)
- Placeholder text: (Optional) Can be added to most of the fields. Placeholders are grey text that are temporary and show an example of the type or format of data input expected.
- Additional settings: (Optional)
- Field ID
- Maximum length in characters (Optional)
- Privacy:
- Public
- Private
- Visible:
- Always
- Only if
The form can only be tested once it is enabled. The Resource Owner can test the form by using a different login account (use a different browser to avoid login issues). Simulate Applicant actions by accessing the relevant restricted data object in the LDaCA Portal and go through each step of the application process.
3.3 Disable or Archive a Form
To disable, archive or hide a form, refer to 1.3 Disable or Archive an Item.
4. Resource
LDaCA REMS manages data license entitlement, hence the resources are the licenses.
Linking the license to data objects is done in the backend for Resource Owners by LDaCA.
4.1 Create a Resource
You cannot edit the resource after you have created and saved it. You can disable and archive a superseded resource and create a new one.
- In Administration > Resources, select Create resource. A blank Create resource window appears:
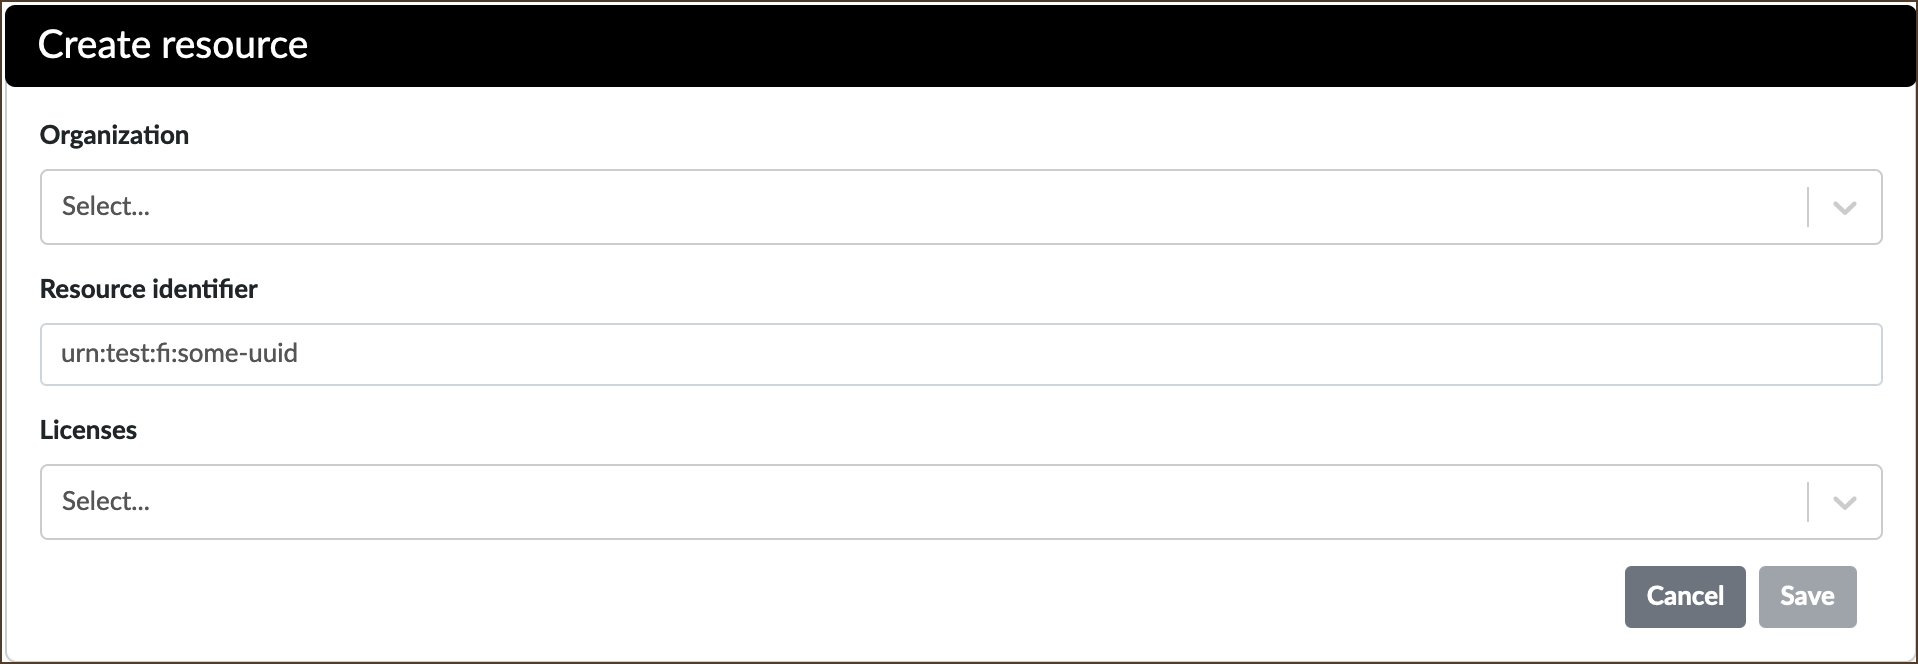
Image Source: LDaCA
- Fill in the fields Organization, Resource identifier and Licenses.
- Organization: select from the drop-down list.
- Resource identifier: enter a unique identifier for the resource which is the license. This can be the URL of the license document.
- Licenses: select from the drop-down list.
- Click Save when done. The resource is now added to the Resources list.
4.2 Disable or Archive a Resource
Refer to 1.3 Disable or Archive an Item.
4.3 Managing the Deny List
The Deny List is a list of blocked users. View this list in Administration > Deny List.
Deny listing is always connected to a certain resource. This means that a user can still apply for access to other resources even if they have been blocked from applying to a certain resource.
The difference between revoking a user’s entitlement and simply adding a user to the Deny List:
- Revoking a user’s entitlement to a resource prevents the user from accessing the data protected by the license and also adds the user to the Deny List. See procedure Revoke Entitlements.
- Directly adding a user to the Deny List of a resource does not automatically block access to the data by a user that has previously been granted permissions. The Owner and Handler(s) are notified if anyone in the Deny List applies for access rights to the same resource.
You can automatically reject new applications from denied users by adding Rejecter Bot in the Handler field of the resource’s workflow (see 5 Workflows).
Revoke Entitlements
Handlers and Resource Owners assigned as Handlers can revoke a user’s resource entitlements e.g. if users misuse their access rights.
You can access the Revoke entitlement action from the relevant application form. It helps to know the application ID (which is in the format YYYY/##, e.g. 2024/28), otherwise perform a search or browse the Processed applications list from the Actions menu (explained below).
To revoke entitlement for a resource:
- Go to the top menu item Actions > Processed applications > Show more
- Locate the application from the list by Id, or by Resource and Applicant
- Click the row’s View button to display the relevant application form
- In the application form’s Actions section, select Revoke entitlement
- In the Revoke entitlement window, add a comment with the reason for revoking entitlement.
It is important to document the reason for revoking entitlement – provide this information and related details in the Comment text field. The information provided will be saved and available only from the application record. Comments are not sent via the standard email notifications.
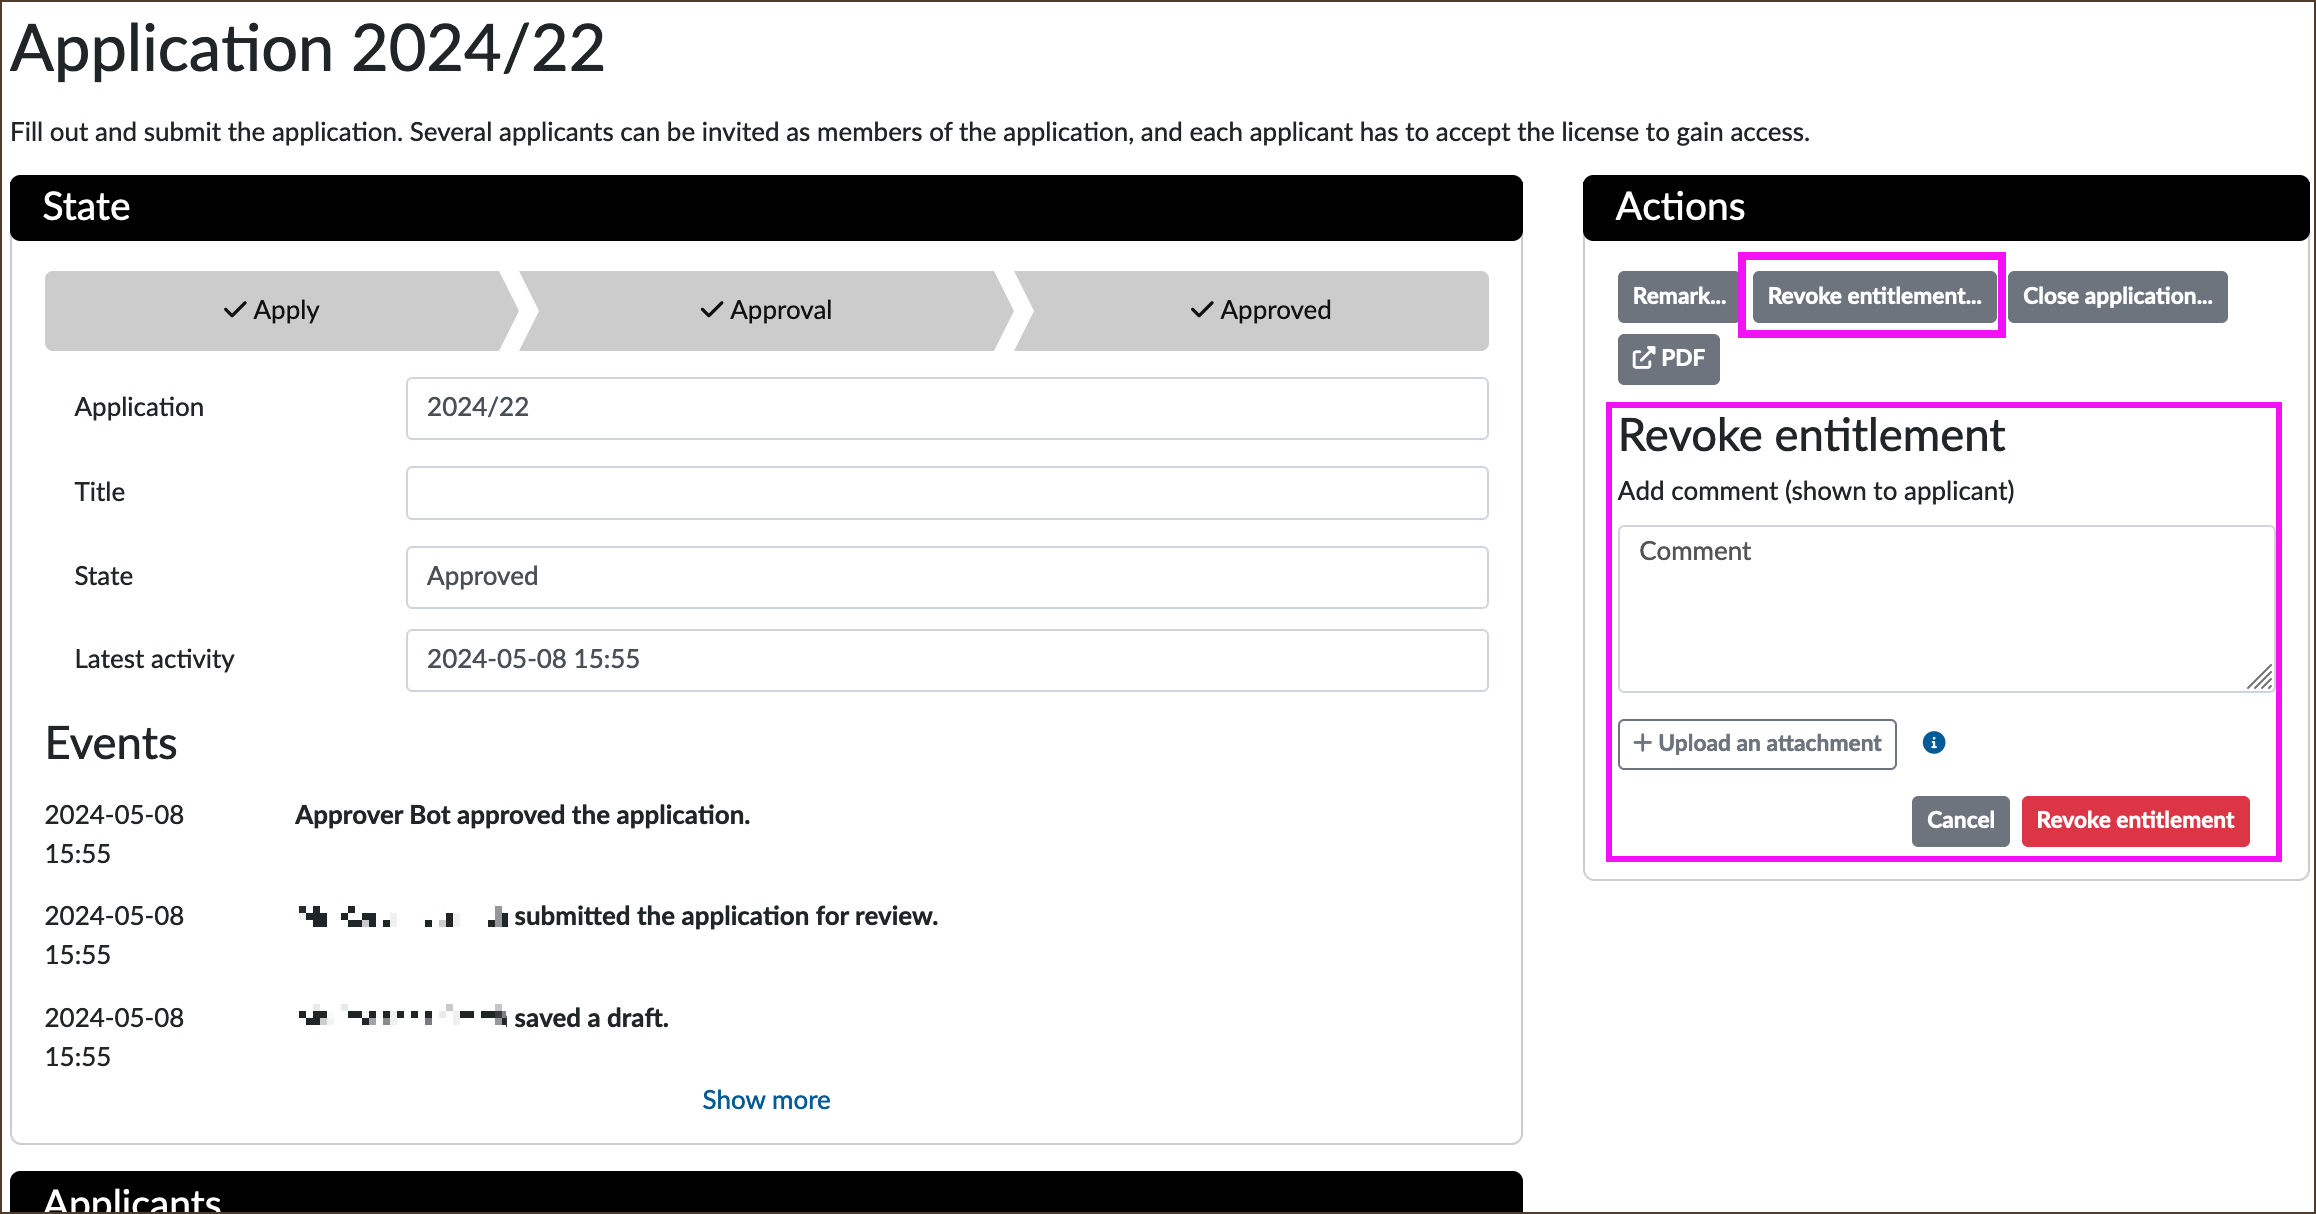
Image Source: LDaCA
- Upload an attachment file (maximum 10KB) if necessary
- Click Revoke entitlement.
Adding or Removing Users from the Deny List
To directly add users to a resource’s Deny List:
- Go to Administration > Resources
- Find the resource (license) the Applicant has misused (you can use the Search field)
- Select the View button - the Resource record will display
- Go to the Deny List section
- From the User field’s drop-down list, select the name of the user
- In the Comment field, type in a comment, e.g. reason for adding the user to the Deny List
- Click Add.
To remove users from the Deny List, do one of the following:
- In Administration > Deny List, locate the blocked user for the relevant resource and click the Remove button.
- In Administration > Resources, locate the relevant resource and click View at right. In the Resource window, scroll down to the Deny List section, locate the user and click Remove.
Once removed from the Deny List, the user regains the permissions that had been approved in the past. Otherwise, they can apply for permissions again if their application was rejected.
5. Workflow
The Resource Owner must create a workflow for their resource (i.e. the data license). In a workflow, the Owner must assign Handlers and connect the workflow to a form and license.
5.1 Create a Workflow
About Handler Bots
Handlers are assigned in the workflow, and therefore it is important to be familiar with the types of Handler Bots available in LDaCA REMS (which can be found in the Handlers drop-down selection list).
- Approver Bot: Automates the approval of license applications. It will approve a submitted application if the Applicant accepts the license terms.
- Rejecter Bot: Automatically rejects applications from users who are in the Deny List for the resource in question.
- Expirer Bot: Removes applications and sends a notification email to Applicants and Handlers about the impending expiration of an entitlement, if applicable.
Create a Workflow
- Go to Administration > Workflows
- Select Create workflow
- The Create workflow window displays:
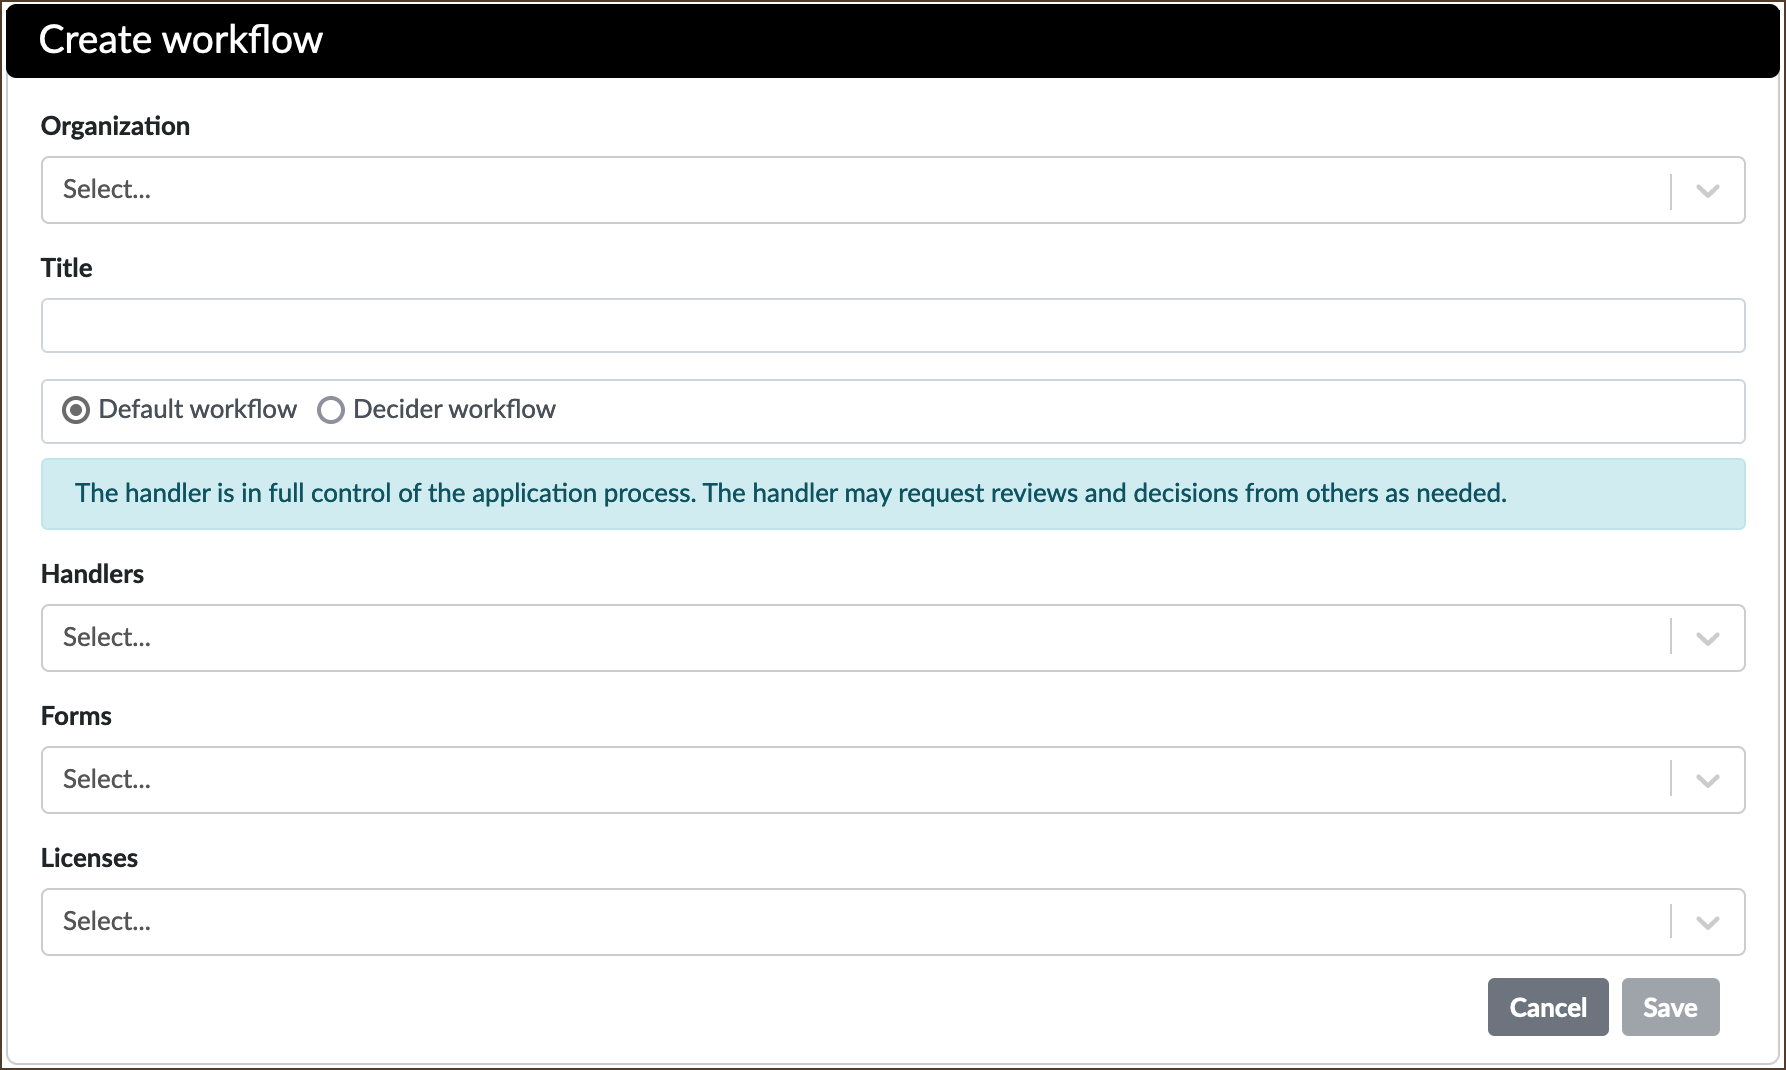
Image Source: LDaCA
- Fill in the fields:
- Organization: Select from the drop-down list
- Title: Enter a title for your workflow. This title will be displayed in the Title column of the Workflows list.
- Choose a workflow type:
- Default workflow: The Handler is in full control of the application process. The Handler may request reviews and decisions from others as needed.
- Resource Owners can assign themselves or other persons as Handlers.
- Adding the Approver Bot as Handler automates the approval of license applications. See more in About Handler Bots.
- Decider workflow: The Handler does not have the authority to approve or reject, but only a separate Decider does.
- Default workflow: The Handler is in full control of the application process. The Handler may request reviews and decisions from others as needed.
- Handlers: A role assigned by an Owner to a user who is responsible for approving or rejecting the applications to resources. Handlers can also revoke an Applicant’s access rights in case of misuse.
- Choose from the Handlers selection drop-down list
- Resource Owners may assign themselves as Handler, too, in order to receive notifications about license applications (see REMS Notifications).
- Forms: Select the relevant form from the drop-down list of forms.
- Licenses: Select the relevant license from the drop-down list of licenses.
- Click Save when done.
Let people know they have been assigned a Handler role; REMS does not send out notifications about this. Having multiple Handlers is recommended to help expedite the approval process. Add Handler Bots according to your choice of Default or Decider workflow.
5.2 Edit a Workflow
Once a Workflow record is saved, you can no longer edit the workflow type (Default or Decider), nor the values in the Forms and Licenses fields.
Only those assigned the role of Owner or Resource Owner can edit the editable fields Organization, Title and Handlers.
To edit the values in the Organization, Title and Handlers fields:
- In Administration > Workflows, locate the required workflow and select its Edit button
- Click into the relevant (editable) field and edit as necessary
- Click Save when done.
5.3 Disable or Archive a Workflow
To disable or archive a workflow, refer to 1.3 Disable or Archive an Item.
6. Catalogue Items
A catalogue item is a resource that has been configured with a workflow, license and form, and made available for users to request an entitlement.
Catalogue items are listed in two places:
- Through the top-level menu Catalogue - this list can be accessed by Applicants, Handlers and Owners
- Via Administration > Catalogue Items - the internal view, not available to Applicants.
In Administration > Catalogue items, each item listed shows its components: Organization, Title, Resource, Form, Workflow, date Created and an Active checkbox, along with View, Edit, Disable and Archive buttons.
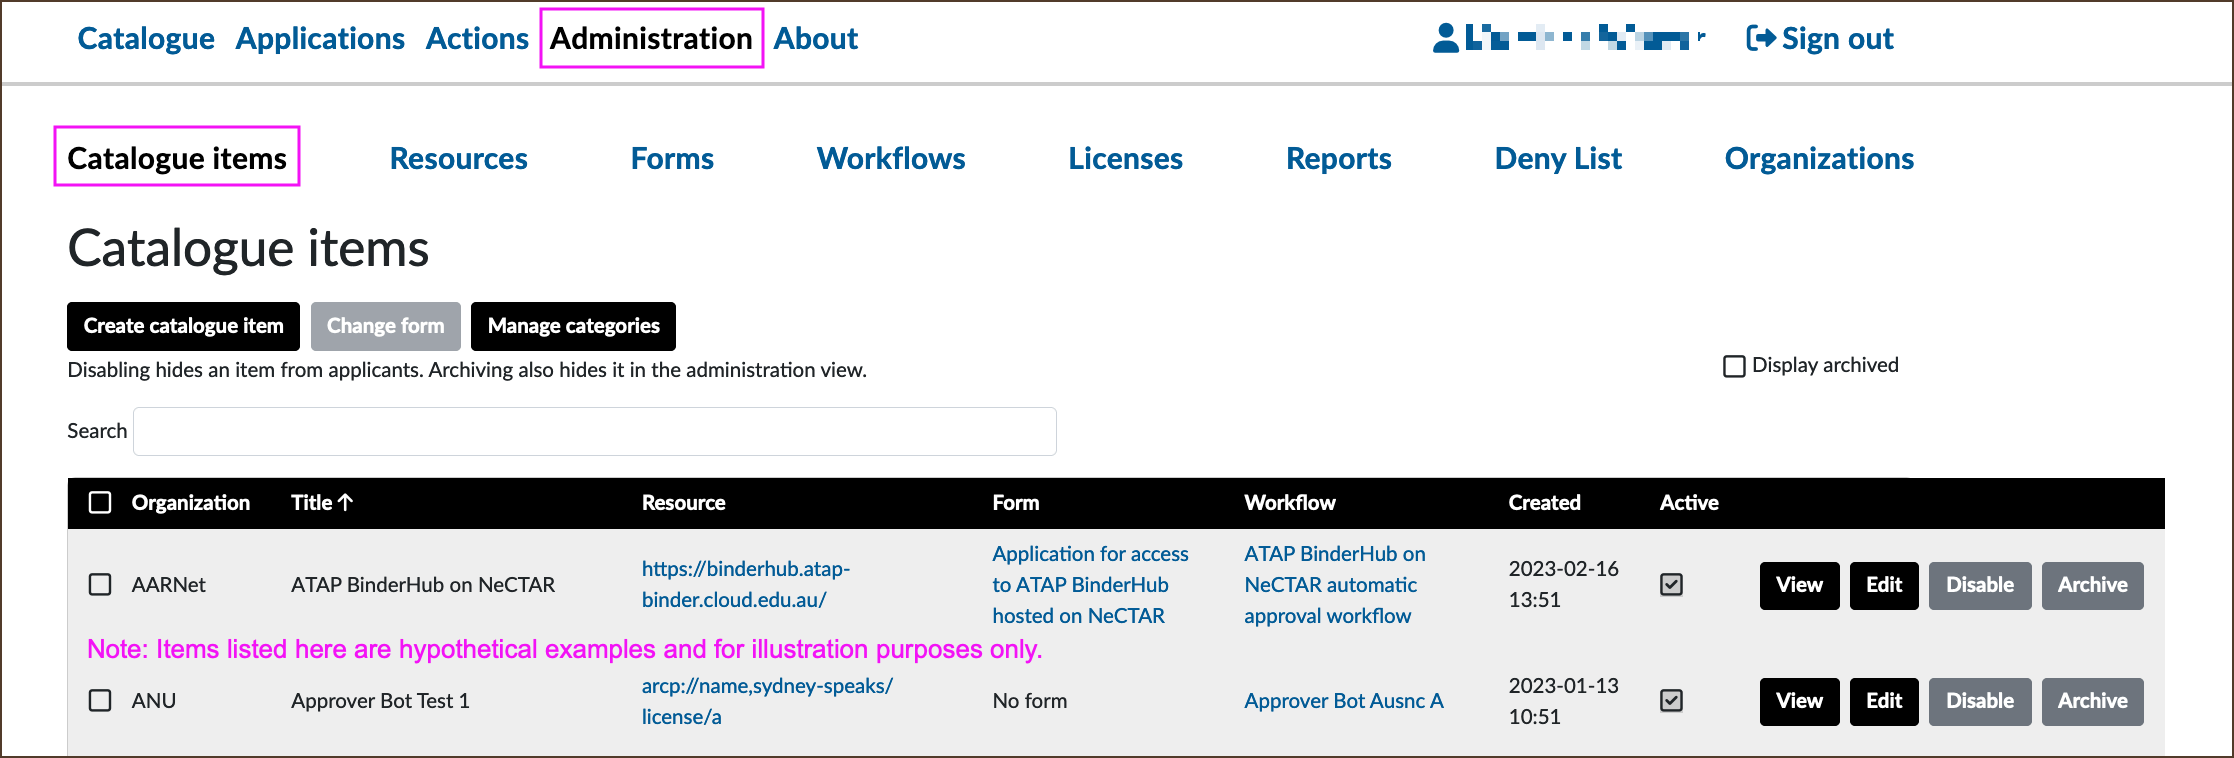
Image Source: LDaCA
6.1 Create a Catalogue Item
Ensure that you have the required elements of a catalogue item in LDaCA REMS, i.e. organization, license, form (whether the default or a custom form), resource and workflow.
- In Administration > Catalogue items, select Create catalogue item
- Fill in the fields in the Create catalogue item window:
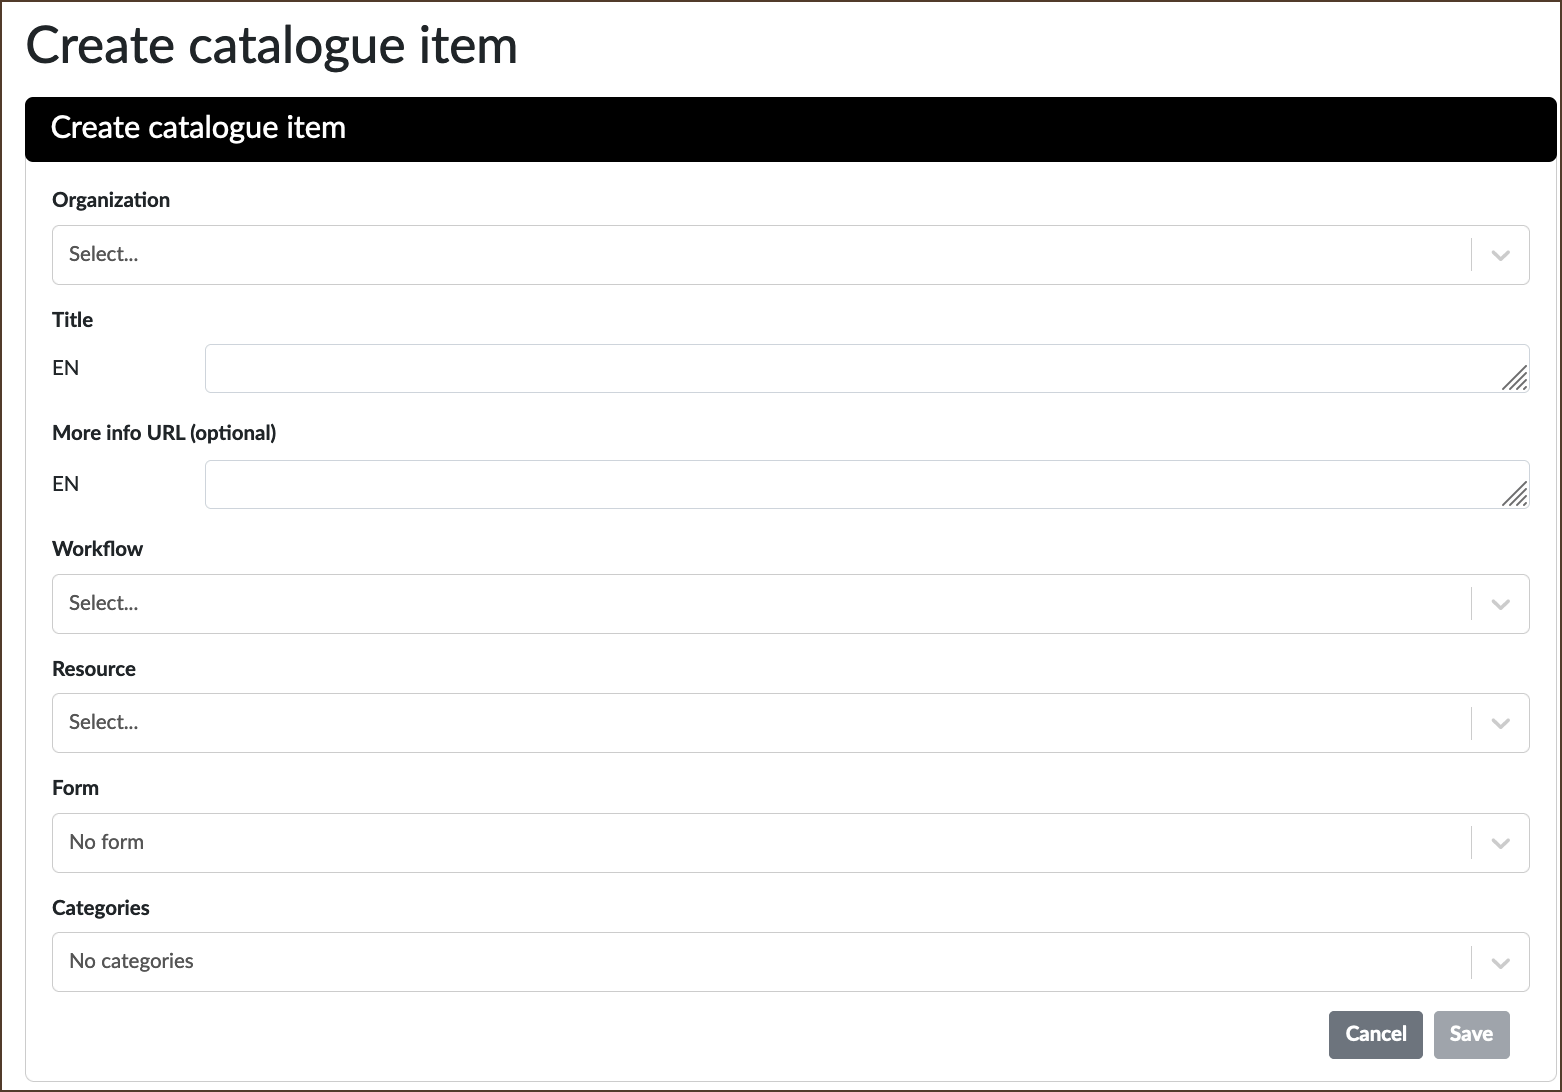
Image Source: LDaCA
- Organization: Select a listed organization from the drop-down list.
- Title: Enter a title for the catalogue item. Choose a title that will make the item easily identifiable in the Catalogue Items list.
- More info URL (optional): If desired, provide a description summary or more information about this catalogue item (e.g. purpose, intended group of users) and the items that comprise it.
- Workflow: Select the relevant workflow from the drop-down list.
- Resource: Select the relevant resource from the drop-down list.
- Form (optional): Select the relevant form from the drop-down list, or leave it blank if using the default form.
- Categories: It is fine to leave this as “No categories”. This feature is useful for categorising items, e.g. by organization, when numerous items are linked to it.
- Click Save when done.
You will need to activate or enable a newly saved Catalogue Item (see below) to make it available for Applicants. Once a Catalogue Item record is saved, the Workflow, Resource and Form fields can no longer be edited. The Organization, Title, More info URL (optional) and Categories fields remain editable.
To enable or make active the newly created Catalogue item:
- In Administration > Catalogue items, locate the relevant Catalogue item from the list
- Either select Enable or tick the Active checkbox.
6.2 Edit a Catalogue Item
Only those assigned the role of Owner or Resource Owner have edit access to catalogue items.
- In Administration > Catalogue items locate the required item and select its Edit button
- Click into the required (editable) field and edit as necessary
- Click Save when done.
6.3 Disable or Archive a Catalogue Item
To disable or archive a catalogue item, refer to 1.3 Disable or Archive an Item.
Once the catalogue item has been created, contact LDaCA staff to finalise the resource entitlement processes for your data.
